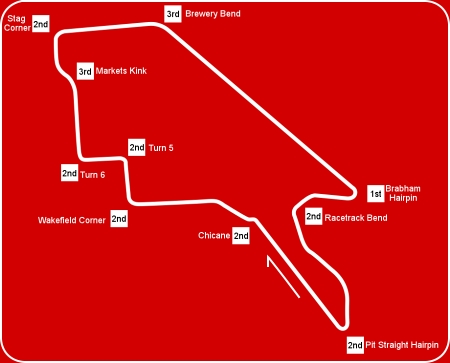
Adelaide
14 turns
(5 left, 9 right)
Street Circuit
Difficulty: medium
Author: Jim Pearson (homepage)
My best time: 1:29.778 (Ferrari)
The first three corners comprise a left-right-left chicane bordered by high kerbs. You should begin making a gentle sweep across the track as soon as you have exited the final corner and aim in the general direction of the end of the pit wall. Shortly before the pit wall ends begin braking in a straight line as if to continue into the pit exit, but as your right front wheel nears the white line begin a reasonably hard turn to the left whilst still braking. From there on gradually begin easing up on the brakes and aim right at the inside kerb. If you have timed it correctly the front should just scrub wide a little so just the inside wheels clunk over the lower portion of the kerb. Your right hand wheels should have just crossed the white line into the pit exit on entry but no more. Going deeper into the pit exit (which it is tempting to do) only means you are more likely to fail to hit the first apex, and/or hit the hay bails further down.
 From the first apex, you can pretty much begin gently accelerating. Hit the second apex in a similar
manor to the first, except you might be able to ride the curb a little higher. This time however aim to
remain over the right as much as possible for a wide sweep into the third part which should be taken
flat out or very nearly flat out (depending on how far to the right you ended up after the second part
and on fuel load).
From the first apex, you can pretty much begin gently accelerating. Hit the second apex in a similar
manor to the first, except you might be able to ride the curb a little higher. This time however aim to
remain over the right as much as possible for a wide sweep into the third part which should be taken
flat out or very nearly flat out (depending on how far to the right you ended up after the second part
and on fuel load).
You should now make your way over to the left of the track again and begin braking for Wakefield Corner immediately under the footbridge. You need to get right over to the left hand side of the track, but execute an early turn in to the corner ahead, just before it becomes visible over the crest in fact. (assuming you are in cockpit view, as you know you should be ;-)). Hopefully the car will now drag its backside over to the inside of the track just in time to make a neat apex half way round the corner.
All being well you can now begin accelerating again, but don't stop turning as you have to sweep out to the outside of the corner (getting right out to the kerb is not necessary) and then back over to the very right hand side of the track for the next 90° left. Here you really do need to brake in a straight line and reasonably early too. Rather like Barbeque Bend at Kyalami you want to be totally in control of the back end of the car in order to be able to take a smooth sweeping line through the corner and finish up right on the outside kerb. Next move right over to the left hand side of the track again and after a short spurt of throttle dab the brakes for the third and final 90° corner in this sequence which differs from the other two in that you need quite a late apex so you can be nicely positioned for Markets Kink.

 Next Page